Saturday, December 17, 2011

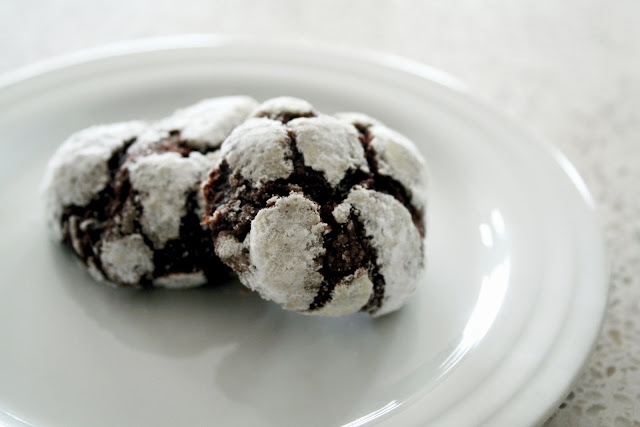
Marshmallow Chocolate Chunk Cookies


After sharing the Handmade Honey Marshmallow recipe from 33 Shades Of Green with you yesterday I thought it would be appropriate to share a cookie recipe that called for marshmallows! I found this on the Real Simple website and can't wait to try them. They seem really simple but oh so yummy!

Recipe courtesy of Real Simple.
Makes 44 cookies| Hands-On Time: 20m | Total Time: 1hr

Ingredients

Directions

  1. Heat oven to 350° F. Line 2 baking sheets with parchment. In a large bowl, whisk together the flour, salt, baking powder, and baking soda; set aside.
  2. In a large microwave-safe bowl, combine the butter and half the chocolate. Microwave on high, stopping and stirring every 30 seconds, until melted and smooth; let cool slightly. Whisk in the sugar, eggs, and vanilla until smooth.
  3. Gradually add the flour mixture, mixing until just combined (do not overmix). Fold in the marshmallows and the remaining chocolate. Let cool for 15 minutes.
  4. Drop mounds of the dough (about 1 heaping tablespoon each) 2 inches apart onto the prepared baking sheets.
  5. Bake, rotating the baking sheets halfway through, until firm around the edges and cracked on the tops, 12 to 15 minutes. Let cool slightly on the baking sheets, then transfer to wire racks to cool completely.
Enjoy!

Friday, December 16, 2011

Creative DIY Wrapping Paper & Homemade Honey Vanilla Marshmallows

With a little imagination you can create unique one of a kind wrapping paper for your Christmas gifts this year. All you need is: brown parcel paper, old maps, newspaper, book pages, fabric, festive ribbon, twine or string and sparkly embellishments. You can add intrigue to brown or white parcel paper using a home made potato or celery stamp or create a one of a kind print with a spruce tree sprig dipped in paint. Once you have designed your paper, add twine or ribbon and use floral wire to attach holly sprigs, berries, seasonal greenery or brightly colored buttons.

Here are some examples of homemade Christmas wrapping paper found on Pinterest.

A creative use for butcher paper, sewing tape and a white pen!


 Maps and red ribbon...


Use newspaper and embellish it with ribbon and a colorful homemade gift tag.


 You can use the pages from a dictionary and choose words that you wish to present on top of the gift.


Sheet music...


Tear out a crossword puzzle or print one off the internet.


Pretty pieces of fabric remnants...


You can use store bought stamps or you can make them yourself!


This rose pattern is created by cutting the end of a bunch of celery and using it as a stamp. 
I think it is such a great idea and it makes an amazing print!
Instructions found here.


 Personalize your ribbon with a rubber stamp. This ribbon is so simply beautiful!


Instead of a cookie...
Today I wanted to share a recipe with you for Handmade Honey Vanilla Marshmallows from Alissa over at 33 Shades Of Green. I have always wanted to make marshmallows and I am excited to try this recipe, click Here to see the full recipe. Check out 33 Shades Of Green blog for lots of delicious recipes and some creative design ideas, I love the gift tags she designed for the marshmallows, so unique!

Image courtesy of 33 Shades Of Green.
This weekend I will be wrapping up all of my last minute Christmas shopping and am excited to share photos of the presents under the tree next week! Have a happy and safe weekend and don't forget to indulge in your favorite Holiday treats,

Thursday, December 15, 2011

Cookie Of The Day: Chocolate Crackle Cookies

Recipe courtesy of Martha Stewart.

 Ingredients

  • 8 ounces bittersweet chocolate, melted and cooled
  • 1 1/4 cups all-purpose flour
  • 1/2 cup Dutch cocoa powder
  • 2 teaspoons baking powder
  • 1/4 teaspoon salt
  • 8 tablespoons (1 stick) unsalted butter, room temperature
  • 1 1/3 cups light-brown sugar, firmly packed
  • 2 large eggs
  • 1 teaspoon pure vanilla extract
  • 1/3 cup milk
  • 1 cup confectioners' sugar, plus more for rolling

Directions

  1. Heat oven to 350 degrees. Chop bittersweet chocolate into small bits, and melt over medium heat in a heat-proof bowl or the top of a double boiler set over a pan of simmering water. Set aside to cool. Sift together flour, cocoa, baking powder, and salt.
  2. In the bowl of a heavy-duty electric mixer fitted with the paddle attachment, beat butter and light-brown sugar until light and fluffy. Add eggs and vanilla, and beat until well combined. Add melted chocolate. With mixer on low speed, alternate adding dry ingredients and milk until just combined. Divide the dough into quarters, wrap with plastic wrap, and chill in the refrigerator until firm, about 2 hours.
  3. On a clean countertop, roll each portion of dough into a log approximately 16 inches long and 1 inch in diameter, using confectioners’ sugar to prevent sticking. Wrap logs in plastic wrap, and transfer to a baking sheet. Chill for 30 minutes. Cut each log into 1-inch pieces, and toss in confectioners’ sugar, a few at a time. Using your hands, roll the pieces into a ball shape. If any of the cocoa-colored dough is visible, roll dough in confectioners’ sugar again to coat completely. Place the cookies 2 inches apart on a Silpat-lined baking sheet. Bake until cookies have flattened and the sugar splits, 12 to15 minutes.
  4. Transfer from oven to a wire rack to let cool completely. Store in an airtight container for up to 1 week.

Happy Holidays!

Wednesday, December 14, 2011

Salted Caramel Chocolate Shortbread & A Holly Wreath

Today was a beautiful day; sunny, blue skies and 28 degrees! I am so lucky to have a gorgeous holly tree in my backyard so today I trimmed some holly branches and used some of our remaining Christmas fir tree trimmings to make a wreath for our front door. Wreaths are an easy DIY that people often overlook. Here are the materials you need to make a wreath: 18" double wire wreath frame, green floral wire, pruning sheers, wire cutters and 6" holly & evergreen boughs.
 Our holly tree...


The frost was so beautiful, it looks like snow.


Materials...


I like to trim the leaves off some of the holly branches.


 First I attach the fir boughs to the wreath frame to give the wreath a solid and full base.


 Then begin attaching the holly around the wreath equally, for a balanced look.


And here it is!


I ran out of thick ribbon so I used a small piece to hang the wreath on my front door. There are also very nice metal wreath hangers at craft stores that are very nice too!


I love making wreaths and recommend you try it too! Nothing says welcome more than a wreath hanging on the front door (especially a candy apple red door!).

Cookie Of The Day: Salted Caramel Chocolate Shortbread Bars

Recipe courtesy of Annie's Eats.
Ingredients:
For the shortbread layer:
2 cups all-purpose flour
2 tsp. baking powder
¼ tsp. salt
1 cup (2 sticks) unsalted butter, at room temperature
½ cup sugar

For the caramel layer:
1 cup (2 sticks) unsalted butter, cut into pieces
1 cup sugar
4 tbsp. light corn syrup
2 cans sweetened condensed milk

For the chocolate layer:
8 oz. semisweet or bittersweet chocolate, finely chopped
1 tsp. light corn syrup
½ cup (1 stick) unsalted butter, cut into pieces
Fleur de sel or sea salt, for sprinkling 
Yield: about 5 dozen small bars

Directions:
  • To make the shortbread layer, preheat the oven to 325° F.  
  • Line a 9 x 13-inch baking pan with parchment paper.  In a small bowl combine the flour, baking powder and salt. Stir with a fork to blend, and set aside.  In the bowl of an electric mixer, beat the butter and sugar on medium speed until well blended, about 1-2 minutes.  With the mixer on low speed blend in the dry ingredients just until incorporated.  Transfer the dough to the prepared baking pan and press in an even layer over the bottom of the pan.  Bake 15-18 minutes or until golden.  (If the crust puffs up a bit while baking, just gently press it down while it is cooling.)  Transfer the pan to a wire rack and let cool completely.  
  • To make the caramel layer, combine the butter, sugar, corn syrup and condensed milk in a medium saucepan over medium heat.  Heat, stirring occasionally, until the butter is melted.  Increase the heat to medium-high and bring to a boil.  Reduce the heat to maintain a simmer, stirring constantly.  Continue simmering and stirring until the mixture turns an amber color and thickens slightly.  Pour the mixture over the shortbread layer, smooth the top, and allow to cool completely and set.  (I chilled at this stage to ensure that the caramel layer would not melt when the warm chocolate was added.)
  • To make the chocolate glaze, combine the chocolate, corn syrup, and butter in a heatproof bowl set over a pan of simmering water.  Heat, stirring occasionally, until the chocolate is completely melted and the mixture is smooth.  Pour evenly over the caramel layer and use an offset spatula to smooth the top.  Allow to cool for a minute or two and then sprinkle with fleur de sel.  Chill, covered, until ready to slice and serve.  

Have a wonderful Wednesday!

Tuesday, December 13, 2011

Cookie Of The Day: Mocha Swirl Cookies


Mocha Swirl Cookies Courtesy of Sprinkle Bakes
Yield: 40 cookies    

3 cups all purpose flour
1 1/2 tsp. baking powder
1/4 tsp. salt
1 cup butter, softened
1 cup sugar
1 egg
1 tsp. pure vanilla extract
1 1/2 tsp instant coffee (I used Starbucks' VIA)
2 oz. Dark chocolate, melted and cooled slightly
  1. In a medium bowl, whisk together flour, baking powder and salt.  Set aside.
  2. In the bowl of a mixer fitted with paddle attachment, beat butter until creamy.
  3. Gradually add sugar to butter while mixer is running.
  4. Add egg and vanilla, beat well.  Scrape down sides and bottom of bowl and mix again until incorporated.
  5. With mixer on low speed, gradually add in flour mixture until just combined.
  6. Remove dough from mixer and divide into two even portions.  Dough should not be sticky.
  7. Return half of the dough to the mixer and add the instant coffee.  Mix until combined and dough is speckled with coffee granules. Use finely powdered instant coffee like Starbucks' VIA, or you may choose to grind standard instant coffee finer in a food processor.  Espresso powder would also work well in this recipe.  Remove coffee dough from mixer.
  8. Return the other half of dough to the mixer and add the melted chocolate.  Mix until well combined.
  9. Roll out each dough separately between two sheets of wax paper - approximately 1/4" thick.  Each piece should be a 9 x14" rectangle. Chill on baking sheets in the refrigerator, at least 1 hour.
  10. When dough is thoroughly chilled, top chocolate dough with coffee dough.  Gently press together the two dough pieces using a rolling pin.
  11. Let dough stand at room temperature until malleable.  
  12. Use a knife to even one side (down the 14" length) of the dough.  This gives you a nice even start for the spiral.
  13. Roll dough tightly, jelly-roll fashion, using the wax paper to guide the dough.  The chocolate portion of dough usually tears a little when rolling. When this happens - STOP- and pinch the dough back together before you continue to roll.  Remember, this is not a race to see how fast you can roll the dough.  Do this slowly and deliberately.  
  14. Cover the dough roll in wax paper, then in a length of plastic wrap.  Chill thoroughly, at least 1 hour.  Turn the dough halfway through chilling to make sure it doesn't become flat on one side.
  15. Heat oven to 350 degrees and line two baking sheets with parchment paper.
  16. Remove dough from refrigerator, uncover and slice in half with a sharp knife.  Place half of dough back in the refrigerator to keep cold.
  17. Cut dough into 1/4" rounds.
  18. Bake cookies for 10-12 minutes.  Let cool for 2-3 minutes on baking sheet before transferring to a cooling rack.
  19. Repeat with remaining dough.
Enjoy!

Monday, December 12, 2011

Dream Home & White Chocolate Kissed Gingerbread Cookies

I had such a busy weekend and didn't have time to make a wreath! This morning I I found myself daydreaming about a winter vacation and had a few minutes to write a quick post with photos of the HGTV Dream Home 2011. Every year my friends and I enter our names into the drawing for the HGTV Dream Home, we always talk about the design and what we would do to change it if / when we win! Here are a few photos of the 2011 Dream Home in Stowe, Vermont. This home was designed in a traditional Arts & Crafts style with sustainable and contemporary touches. I think it has just about anything you may want in a destination winter vacation home and look at that view...


The chimney is made of copper, such a rustic and beautiful material for this application.


The kitchen has all of the modern amenities. They made great use of the kitchen design triangle here. 
I love the stove on the island, with a view out the window at the incredible views.

There are two sinks! and an extra large range.

What an amazing fridge, I think it is genius to have a view through glass door and it saves energy too.


The ceiling panels are so incredible, first off every mountain cabin needs a vaulted ceiling and the wood paneling is very unique and modern.

This is the master, the doors are all made of aged wood to add to the rustic nature of the home. I think it works in a very industrial way! Great choice of color, the red gives a warm aesthetic.


The master has a view from the bed through the master bath to the outdoors, there are amazing soaring ceilings and such cool drapery dividing the space.

Master bath...


The guest bedroom is dark and moody. The use of symmetry gives a modern and formal appearance and the textures in the space give that rustic charm of a cabin in the woods. I love the pendants and mirrors on each side of the bed and the charcoal grey paint color.


Lovely!


Guest bathroom...
The living area has a one of a kind barn door and coordinating wood ceiling. 
The kitchenette is so practical, what great design!


Isn't this so cool? The rough wood and the smooth stainless steel are a match made in heaven. What a perfect place to entertain!


This is the "ski dorm" and a great way to accommodate guests. Children or adults alike would be able to use this practical dorm like living space. The reds and golds are perfectly warm and inviting.


This is the "ski dorm" bathroom. It is ready to host a multitude of guests with three sink bowls and separate shower stalls. The signage on the wall reminds me of a ski lodge!

Frosted glass shower doors give just the right amount of privacy needed in this dorm style bathroom.

Laundry room...double washer and dryer accommodate lots of laundry!

Back terrace...

This masonry used at the base of the house gives the look of an "old-world" stone facade.

This Vermont home is an example of outstanding design. I would love to spend my winter vacation here!

Cookie Of The Day: White Chocolate Kissed Gingerbread Cookies


Ingredients:
3 cups flour
2 tsp. Ginger, Ground
1 tsp. Cinnamon, Ground
1 tsp. baking soda
1/4 tsp. Nutmeg, Ground (I used fresh)
1/4 tap salt
3/4 cup (1 1/2 sticks) unsalted butter, at room temperature
3/4 cup firmly packed brown sugar
1/2 cup molasses
1 egg
1/4 cup granulated sugar
1 tsp. Vanilla Extract
1 cup white chocolate chips

Directions:
Mix flour, ginger, cinnamon, baking soda, nutmeg and salt in large bowl.
Beat butter and brown sugar in large bowl with electric mixer on medium speed until light and fluffy.
Add molasses, egg and vanilla; beat well. Gradually beat in flour mixture on low speed until well mixed. Press dough into a thick flat disk. Wrap in plastic wrap. Refrigerate 4 hours or overnight.
Preheat oven to 350°F. Shape dough into 1-inch balls. Roll in granulated sugar. Place 2 inches apart on ungreased baking sheets.
Bake 8 to 10 minutes or until edges of cookies just begin to brown. Immediately press about 5-6 white chocolate chips into center of each cookie. Remove to wire racks; cool completely. Store cookies in airtight container up to 5 days.

Adapted from McCormick and Company Inc.

Enjoy!