Saturday, December 10, 2011

Cookie Of The Day: Linzer Sandwich Cookies

Linzer Sandwich Cookies, recipe courtesy of Land O Lakes!


Ingredients

1 cup Land O Lakes® Butter, softened
1/2 cup powdered sugar
1 teaspoon almond extract*
1/4 teaspoon salt
2 cups all-purpose flour
Powder sugar
Small decorator candies, if desired
White decorator gel, if desired
3 tablespoons seedless raspberry or apricot jam

 Directions

1. Combine butter, 1/2 cup powdered sugar, almond extract and salt in large bowl; beat at medium speed until creamy. Reduce speed to low; add flour. Beat until well mixed.

2. Divide dough in half. Shape each half into a ball; flatten slightly. Wrap each in plastic food wrap; refrigerate until firm (at least 1 hour).

3. Heat oven to 350°F. Roll out dough on lightly floured surface, one-half at a time (keeping remaining dough refrigerated), to 1/4-inch thickness. Cut with 2-inch cookie cutters. Cut out center from half of cookies using smaller decorative cookie cutter. Place cookies, 1 inch apart, onto ungreased cookie sheets. Bake for 7 to 9 minutes or until edges are lightly browned. Cool 1 minute on cookie sheets; remove to wire cooling rack. Cool completely.

4. Place cooled cookies with center cut-out onto waxed paper; sprinkle with powdered sugar. Decorate with small candies attached with decorator gel, if desired. Spread bottom-side of cookies without cut-out with 1/4 teaspoon jam. Top with center cut-out cookie, powdered sugar-side up.


*Substitute rum flavoring or orange extract.

I can't wait to have a full day to bake all of these delicious Christmas cookies. I think it is one of the best parts of the Holidays! Have a happy Saturday and check back tomorrow to see my holly wreath!

Friday, December 9, 2011

Design Tip: Designing A Christmas Tablescape

Happy Friday, today I am looking for design inspiration for a Christmas table setting. We are hosting our annual family Christmas party this year and I want to decorate for the occasion! I am thinking of using lots of fresh greenery and mistletoe along with accents of mercury and red! I have always loved a classic Christmas look. I found this "Party Planning" guide in Lonny Magazine and thought it was a great resource for party planning and decorating for any occasion. (Click on the link to see it larger).

Remember when decorating your table for the Holidays you can use traditional colors: red, white, silver & green or you can design out of the box with purples, pinks and blues, what ever you do remember to sip some eggnog and have some fun with it! I am accepting clients for Holiday decorating projects as well as full service interior design projects, I look forward to hearing from you at Blaiseadkisondesign@gmail.com.


Lonny Mag


Via
Via
Via
Via
Via
Via
Via
Via
Better Homes & Gardens
Martha Stewart

 Cookie Of The Day: Cranberry Bliss Bars

Recipe Courtesy of Cooking Cache

Cake
1 cup (2 sticks) butter, softened
1 1/4 cups light brown sugar, packed
3 eggs
1 1/2 teaspoons vanilla
1 teaspoon ginger
1/4 teaspoon salt
1 1/2 cups all-purpose flour
3/4 cup diced dried cranberries
6 ounces white chocolate, cut into chunks

Frosting
4-ounces cream cheese, softened
3 cups powdered sugar
4 teaspoons lemon juice
1/2 teaspoon vanilla extract
1/4 cup diced dried cranberries

Drizzled Icing
1/2 cup powdered sugar
1 tablespoon milk
2 teaspoons vegetable shortening

1. Preheat oven to 350°F.

2. Make cake by beating butter and brown sugar together with an electric mixer until smooth. Add eggs, vanilla, ginger, and salt and beat well. Gradually mix in flour until smooth. Mix 3/4 cup diced dried cranberries and white chocolate into the batter by hand. Pour batter into a well-greased 9x13" baking pan. Use a spatula to spread the batter evenly across the pan. Bake for 35 to 40 minutes or until cake is light brown on the edges. Allow cake to cool.

3. Make frosting by combining softened cream cheese, 3 cups powdered sugar, lemon juice and vanilla extract in a medium bowl with an electric mixer until smooth. When the cake has cooled, use a spatula to spread frosting over the top of the cake.

4. Sprinkle 1/4 cup of diced cranberries over the frosting on the cake.

5. Whisk together 1/2 cup powdered sugar, 1 tablespoon milk, and shortening. Drizzle icing over the cranberries in a sweeping motion or use a pastry bag with a fine tip to drizzle frosting across the top of the cake.

6. Allow cake to sit for several hours, then slice the cake lengthwise (the long way) through the middle. Slice the cake across the width three times making a total of eight rectangular slices. Slice each of those rectangles diagonally creating 16 triangular slices.


Now I am just hoping for some snow...
I will be sure to post photos of my table setting! Also check in over the weekend as I post recipes and step by step instructions to make a holly wreath for your front door...

Thursday, December 8, 2011

Cookie Of The Day: Fudgy Chocolate Brownies

Courtesy of: Real Simple.


Makes 16 brownies| Hands-On Time: 20m | Total Time: 1hr 30m

Ingredients

Directions

  1. Heat oven to 350° F. Spray an 8-inch square baking pan with the cooking spray. Line the pan with 2 crisscrossed pieces of parchment paper, leaving an overhang on all sides; spray the parchment with the cooking spray.
  2. In a medium bowl, whisk together the flour, cocoa powder, and salt.
  3. In a medium saucepan, melt the butter and chocolate, stirring often, over medium-low heat. Remove from heat and mix in the sugar and vanilla. One at a time, mix in the eggs; mix in the flour mixture until just combined (do not over mix).
  4. Spread the batter in the prepared pan and bake until a toothpick inserted in the center comes out clean, 28 to 32 minutes. Cool completely in the pan.
  5. Holding both sides of the paper overhang, lift the cake out of the pan, transfer to a cutting board, and cut into 16 squares. Store the brownies in an airtight container at room temperature for up to 5 days.

Wednesday, December 7, 2011

Home Made Snow Globes & Coconut Macaroons

Last weekend we made home made snow globes using recycled jars, distilled water, glycerin and glitter. The result was amazing! Here are the directions as well as some of our photos:

Almost any jar works for this project: Baby-food, pimiento, and olive jars are good choices. You will also need oil-based enamel paint, sandpaper, epoxy,  distilled water, glitter, and glycerin.


Look for plastic or ceramic figurines (metal ones are prone to rust) at flea markets and hobby or model-railroad shops. Synthetic evergreen tips are available at many floral-supply stores.


Sand the inside of the lid until the surface is rough. With clear-drying epoxy, 
adhere the figurine to the inside of the lid, and let the epoxy dry.


Fill the jar almost to the top with distilled water; add a pinch of glitter and a dash of glycerin to keep the glitter from falling too quickly. Don't add too much, or the glitter will stick to the bottom of the jar when it's flipped. Screw on the lid tightly, being careful not to dislodge the figurine. 
Turn the jar over and back again and let it snow.


I have always loved snow-globes and it was so cool to make them from recycled jars! I think it is a very easy way to make a home made Christmas gift and a very fun process...


Cookie Of The Day: Chocolate-Dipped Coconut Macaroons 
Recipe courtesy of: Real Simple


Makes 32 macaroons| Hands-On Time: 30m | Total Time: 2hr 05m

Ingredients:
Directions:
  1. Heat oven to 325° F.
  2. In a medium bowl, combine the coconut, egg whites, sugar, flour, salt, and vanilla.
  3. Drop packed tablespoonfuls of the mixture onto parchment-lined baking sheets, spacing them 1 inch apart.
  4. Bake, rotating the baking sheets halfway through, until lightly golden, 25 to 30 minutes. Cool slightly on the baking sheets, then transfer to wire racks to cool completely.
  5. When cool, dip the bottom of each macaroon in the chocolate and place on a parchment-lined baking sheet. Refrigerate until firm, 20 to 30 minutes. Store the macaroons in an airtight container at room temperature for up to 7 days.
You can also make these without the chocolate coating...they are so, so, so yummy!

Monday, December 5, 2011

Cookie Of The Day: Peanut Butter Cookies

 
Recipe courtesy of Pillsbury...

INGREDIENTS 
1/2 cup granulated sugar
1/2 cup packed brown sugar
1/2 cup butter or margarine, softened
1/2 cup peanut butter
1 teaspoon vanilla
1 egg
1 1/4 cups all-purpose flour
1 teaspoon baking soda
1/2 teaspoon salt
4 teaspoons sugar

DIRECTIONS
1. Heat oven to 375°F. In large bowl, beat 1/2 cup granulated sugar, the brown sugar and butter with electric mixer on medium speed until light and fluffy, scraping bowl occasionally. Beat in peanut butter, vanilla and egg until well blended. On low speed, beat in flour, baking soda and salt until well combined, scraping bowl occasionally.
2. Shape dough into 1-inch balls; place 2 inches apart on ungreased cookie sheets. With fork dipped in 4 teaspoons sugar, flatten balls in crisscross pattern.
3. Bake 6 to 9 minutes or until set and golden brown. Immediately remove from cookie sheets.

Enjoy! 

Dream Home & Lemon Bars

Happy Monday...What a busy weekend we had, we found the perfect tree, we decorated for Christmas, baked cookies and enjoyed every minute of it!

Today I wanted to share with you the personal cottage of Sarah Richardson, interior designer from Vancouver, BC and host of HGTV's "Sarah 101". I love her style, she mixes antique market pieces with modern furniture and the result is exquisite, I think a mixture of styles in one space is a must. I love the look of traditional architecture with modern and vintage touches. She describes her family cottage as: "An idyllic off-the-grid getaway is renovated inside and out, drawing inspiration from the natural surroundings and blending vintage treasures with cheerful summer hues."

Enjoy!

 This kitchen is so sweet, it was the inspiration for the cookie of the day. 
Seems like a home you would find freshly baked lemon bars...

What a unique use for outdoor lantern lights!


I love this soothing color palette for a kitchen, the tile backsplash is so beautiful.
They used reclaimed wood paneling in the kitchen.

The views are incredible and natural light is so important.
The house is entirely off the grid so natural lighting is very important.


Views don't get better than this!

Master Bedroom...The master gives the feeling of being on a ship. 


Guest Bedroom...Wood ceilings are a must in a cabin.
What a cool vintage brass bed!


Kids Loft...


A skylight above a tub is such a great idea...


 And oh what a cute bunkie...They built a 10' x 12' cabin on the property for guest use reusing
materials left over from the main cabin. What a simple structure full of design!

All images courtesy of Sarah Richardson Design.

Sarah does an incredible job with her designs. She is very inspiring to me...


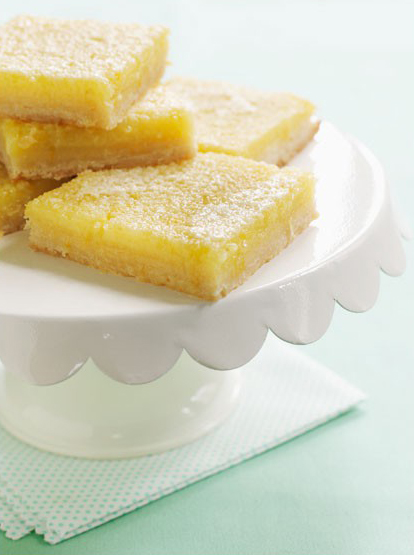
Cookie Of The Day: Lemon Bars

Makes 24 bars| Hands-On Time: 30m | Total Time: 3hr 30m

Ingredients

  • Crust:
  • nonstick cooking spray
  • 1 1/2 cups all-purpose flour, spooned and leveled
  • 1/2 cup (1 stick) cold unsalted butter, cut into pieces, plus more for the pan
  • 1/3 cup granulated sugar
  • 1/4 teaspoon kosher salt
  • Filling:
  • large eggs
  • large egg yolk
  • 2/3 cup granulated sugar
  • 1/3 cup fresh lemon juice
  • 2 teaspoons finely grated lemon zest
  • 2 tablespoons all-purpose flour
  • 2 tablespoons heavy cream
  • 1/8 teaspoon kosher salt
  • confectioners’ sugar, for dusting

Directions

  1. Heat oven to 350° F. Spray an 8-inch square baking pan with the cooking spray. Line the pan with 2 crisscrossed pieces of parchment, leaving an overhang on all sides; spray the parchment with the cooking spray.
  2. Make the crust: In a food processor, combine the flour, butter, granulated sugar, and salt; pulse until fine crumbs form. Press the mixture firmly into the bottom of the prepared pan and bake until pale golden, 25 to 30 minutes.
  3. Meanwhile, make the filling: In a medium bowl, whisk together the eggs, egg yolk, granulated sugar, lemon juice, lemon zest, flour, cream, and salt.
  4. When the crust is baked, re whisk the lemon mixture and pour onto the hot crust. Bake until just set, 15 to 18 minutes. Cool completely in the pan, then refrigerate until cold, about 2 hours.
  5. Holding both sides of the paper overhang, lift the cake out of the pan, transfer to a cutting board, and cut into 24 rectangles (6 rows by 4 rows). Store the bars covered in the refrigerator for up to 3 days. Dust with the confectioners’ sugar before serving.
A cottage design that is completely off the grid and delicious lemon bars, what a perfect way to start off the week!

Sunday, December 4, 2011

Cookie Of The Day!

Today's recipe is delicious Gingerbread Men courtesy of Joy of Baking...


Gingerbread: 
  • 3 cups (390 grams) all purpose flour
  • 1/2 teaspoon salt
  • 3/4 teaspoon baking soda
  • 2 teaspoons ground ginger
  • 1 teaspoon ground cinnamon
  • 1/4 teaspoon ground nutmeg
  • 1/4 teaspoon ground cloves
  • 1/2 cup (113 grams) unsalted butter, room temperature
  • 1/2 cup (100 grams) granulated white sugar
  • 1 large egg
  • 2/3 cup (160 ml) unsulphured molasses (To prevent molasses from sticking to the measuring cup, first spray the cup with a non stick vegetable spray.)

Confectioners Frosting:
  • 2 cups (230 grams) confectioners sugar
  • 1/2 cup (113 grams) unsalted butter, room temperature
  • 1 teaspoon pure vanilla extract
  • 1 1/2 tablespoons milk or light cream
Gingerbread Men: In a large bowl, sift or whisk together the flour, salt, baking soda, and spices. 
In the bowl of your electric mixer, with the paddle attachment, (or with a hand mixer) beat the butter and sugar until light and fluffy. Add the egg and molasses and beat until well combined. Gradually add the flour mixture beating until incorporated.
Divide the dough in half, and wrap each half in plastic wrap and refrigerate until firm (at least two hours or even overnight). 
Preheat oven to 350 degrees F (177 degrees C) and place rack in center of oven. Line 2 baking sheets with parchment paper.
On a lightly floured surface, roll out the dough to a thickness of about 1/4 inch. Use a gingerbread cutter to cut out the cookies.  With an offset spatula lift the cookies onto the baking sheet, placing about 1 inch (2.5 cm) apart. If you are hanging the cookies or using as gift tags, make a hole at the top of the cookies with a straw or end of a wooden skewer. (If cookies are a little soft, place the baking sheet (with the cookies) in the fridge for about 10 minutes. This will prevent the cookies from losing their shape.)
Bake for about 8 - 12 minutes depending on the size of the cookies. They are done when they are firm and the edges are just beginning to brown. Remove the cookies from the oven and cool on the baking sheet for about 1 minute, then transfer to a wire rack to cool completely. If desired, you can press raisins, currants, or candies into the dough for eyes and buttons while the cookies are still warm. Otherwise, confectioners frosting can be used to decorate the cookies. Store in an airtight container.
Confectioners Frosting: In an electric mixer (or with a hand mixer), beat the butter until smooth and well blended.  Add the vanilla extract. With the mixer on low speed, gradually beat in the sugar. Scrape down the sides of the bowl and beater. Add the milk and beat on high speed until frosting is light and fluffy (about 3-4 minutes). Add a little more milk if needed. Tint frosting with food color, if desired. Place the frosting in a pastry bag fitted with a decorative tip and decorate the gingerbread men as desired.
Makes about 3 dozen cookies depending on the size of cookie cutter used.

See you Monday!
(icing or powdered sugar), sifted